
Blog
How To Put A Karcher Pressure Washer Together
Using a pressure washer can be a great way to clean your outdoor surfaces effectively and efficiently. Karcher pressure washers are known for their superior power and performance, making them a popular choice among homeowners and professionals alike. If you have recently purchased a Karcher pressure washer and are unsure of how to put it together, don’t worry – we’ve got you covered! In this guide, we will walk you through the step-by-step process of assembling your Karcher pressure washer so that you can start cleaning in no time.
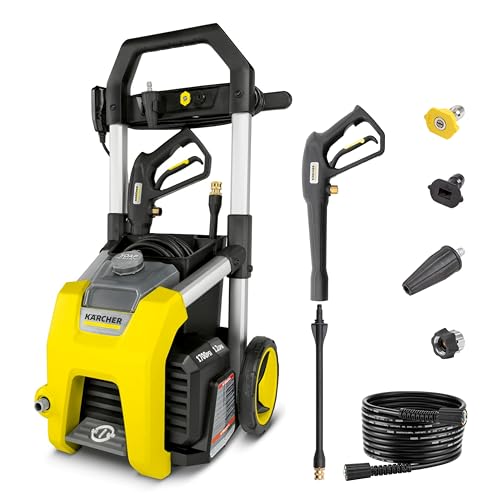
Firstly, it is important to ensure that you have all the necessary components and accessories that come with your Karcher pressure washer. These may include the pressure washer unit, high-pressure hose, spray gun, lance, nozzle, detergent suction tube, and any additional attachments or extensions. Having all the parts on hand will make the assembly process much easier and smoother.
The next step is to connect the high-pressure hose to both the pressure washer unit and the spray gun. Take one end of the high-pressure hose and attach it to the water outlet on the pressure washer unit. Make sure to tighten it securely to prevent any leaks. Then, take the other end of the high-pressure hose and connect it to the spray gun. Again, tighten it securely to ensure a proper seal.


Once the high-pressure hose is connected, it’s time to attach the lance and nozzle. The lance is the long, slender tube that extends from the spray gun, while the nozzle is the small attachment at the end of the lance that controls the spray pattern. Simply insert the lance into the spray gun and turn it clockwise to lock it in place. Then, attach the desired nozzle by pushing it firmly into the end of the lance until it clicks into position.
Finally, if your Karcher pressure washer has a detergent suction tube, you can attach it to the pressure washer unit. This tube allows you to apply detergent directly from a container or bottle to increase the cleaning power. Simply insert one end of the suction tube into the detergent container and the other end into the designated detergent inlet on the pressure washer unit. Make sure the tube is positioned correctly and securely inserted to prevent any leaks.
And there you have it – your Karcher pressure washer is now fully assembled and ready for use! Before starting your cleaning tasks, always remember to read the manufacturer’s instructions and safety guidelines to ensure proper usage. With your Karcher pressure washer, you can tackle even the toughest cleaning jobs effortlessly and achieve outstanding results.
Do a Step-by-Step Assembly of a Karcher Pressure Washer
Assembling a Karcher pressure washer is a straightforward process that can be completed in just a few easy steps. Follow this step-by-step guide to put your pressure washer together:
Step 1: Unpack the Box and Check the Contents
Start by carefully unpacking the box and verifying that you have received all the necessary components. The package should contain the pressure washer body, a spray gun, a high-pressure hose, a wand, and any additional accessories or attachments.
Step 2: Connect the High-Pressure Hose
Locate the high-pressure hose and attach it to the water outlet on the pressure washer body. Make sure the connection is secure by tightening the coupling by hand. Avoid using any tools that could damage the coupling.
Step 3: Attach the Wand and Spray Gun
Next, connect the wand to the end of the high-pressure hose. Align the grooves on the wand and the hose, and then twist the two pieces together until they lock into place. Once the wand is securely attached, slide the spray gun onto the other end of the wand and ensure a tight fit.
Step 4: Prepare for Water Supply
Before turning on the pressure washer, make sure you have a suitable water supply. Ensure that the water source is turned on and that the hose is not kinked or obstructed. Proper water flow is essential for the pressure washer to operate effectively.
Step 5: Insert and Secure Detergent Bottle (If Applicable)
If your Karcher pressure washer has a detergent bottle attachment, insert it into the designated slot on the pressure washer body. Ensure the bottle is securely in place to prevent any leaks during operation.
Step 6: Power On and Test
Once all the components are securely attached, plug in the pressure washer and turn it on. Test the functionality by squeezing the trigger on the spray gun. If everything is assembled correctly, you should see a steady stream of water coming out of the nozzle.
That’s it! You have successfully assembled your Karcher pressure washer and are now ready to tackle your cleaning tasks with ease.
| Components | Attachments |
|---|---|
| Pressure washer body | Spray gun |
| High-pressure hose | Wand |
| Additional accessories |
Prepare the Required Tools for Assembly
Before you begin putting your Karcher pressure washer together, it’s important to gather all the necessary tools. Having the right tools on hand will ensure a smooth and efficient assembly process.
Here are the tools you’ll need:
- Phillips screwdriver: This screwdriver is essential for tightening screws during the assembly process.
- Adjustable wrench: You’ll need this tool to tighten and loosen nuts and bolts.
- Pliers: Pliers will come in handy for gripping and manipulating small parts.
- Socket set: A socket set will be necessary for tightening or loosening bolts of various sizes.
- Hammer: A hammer may be required for certain assembly steps that involve tapping components into place.
- Tape measure: This tool will be useful for measuring and aligning components properly.
Before you start assembling your Karcher pressure washer, double-check that you have all the tools listed above. This will save you time and frustration during the assembly process.
Unpack the Karcher Pressure Washer Components
When you receive your Karcher pressure washer, the first step is to unpack all the components carefully. Make sure you have a clean and clear workspace to work with. It is important to take your time during this process to prevent any damage to the pressure washer or its parts.
Start by removing the pressure washer itself from its packaging. The pressure washer should be securely wrapped and protected to avoid any scratches or other damage during transit. Take off any plastic wrap or covers that may be on the pressure washer before proceeding.
Next, locate the hose and spray gun. These components are typically packaged separately from the pressure washer itself. Remove them from their packaging and inspect them for any visible damage. The hose should be flexible and free from any kinks or twists, while the spray gun should be clean and in good working condition.
You will also find various attachments and accessories with your Karcher pressure washer. These may include nozzles, brushes, and detergent bottles. Carefully unwrap each item and check them for any damage. Ensure that all the attachments are securely attached to their respective holders or compartments.
Lastly, check the instructions manual and any additional paperwork that came with the pressure washer. Read through them carefully to familiarize yourself with the different components and their functions. It is important to have a good understanding of how to assemble and use the pressure washer safely.
By unpacking all the components of your Karcher pressure washer and inspecting them thoroughly, you can ensure that everything is in proper working order before proceeding with the assembly process.
Assemble the Handle and Frame of the Pressure Washer
Once you have unpacked your Karcher pressure washer, the first step in putting it together is to assemble the handle and frame. This is an essential part of the process, as it provides stability and support for the pressure washer while in use.
Start by aligning the handle with the frame in the designated slots. Make sure that the handle is facing the correct way, with any buttons or controls facing towards you. Once aligned, firmly push the handle into place until it clicks or locks into position.
Next, secure the handle to the frame by tightening the screws or bolts provided. Use a screwdriver or wrench to ensure that the screws are securely fastened, but be careful not to overtighten and strip the threads.
Once the handle is securely attached to the frame, check for any wobbling or loose parts. If necessary, go back and double-check the tightness of the screws or bolts. A sturdy and stable handle and frame are crucial for the safe and efficient operation of the pressure washer.
Finally, ensure that the handle is comfortable for you to grip and operate. Take a moment to adjust the positioning of the handle if needed, making sure that it feels natural and ergonomic in your hand.
With the handle and frame properly assembled, you can now move on to connecting hoses, nozzles, and other accessories to complete the setup of your Karcher pressure washer.
Note: It is always a good idea to refer to the instruction manual provided by Karcher for specific assembly instructions and safety guidelines.
Connect the High-Pressure Hose to the Pressure Washer
After assembling the main parts of your Karcher pressure washer, it’s time to connect the high-pressure hose. The high-pressure hose is a crucial component that delivers pressurized water to effectively clean surfaces and remove dirt and grime.
Before connecting the high-pressure hose, ensure that the pressure washer is turned off and the trigger gun is in the closed position. This will help prevent any accidental spraying or injury.
Step 1: Locate the High-Pressure Outlet
Find the high-pressure outlet on the Karcher pressure washer. This outlet is usually marked with a label or symbol indicating where the high-pressure hose should be connected. It is typically located at the back or side of the pressure washer.
Step 2: Attach the High-Pressure Hose
Take one end of the high-pressure hose and attach it firmly to the high-pressure outlet on the pressure washer. Make sure to align the threaded connector properly to ensure a secure and watertight connection.
Use your hands to tighten the connection, but be careful not to overtighten, as this could damage the threads or cause leaks. If necessary, you can use an adjustable wrench to provide additional tightening. However, be cautious not to apply too much pressure.
Step 3: Connect the Other End of the Hose
Now, take the other end of the high-pressure hose and attach any available accessories or spray gun that may be included with your Karcher pressure washer. Follow the manufacturer’s instructions for proper attachment.
Similar to the previous step, ensure a tight connection without overtightening. Again, use your hands to tighten and then check for any signs of leakage.
Once the high-pressure hose is securely connected to both the pressure washer and the spray gun or accessory, you are ready to use your Karcher pressure washer and start tackling your cleaning tasks.
Attach the Spray Wand and Nozzle to the Pressure Washer
Once you have properly assembled the pressure washer and connected the hose and trigger gun, the next step is to attach the spray wand and nozzle. Here’s how you can do it:
Step 1: Locate the spray wand and nozzle that came with your Karcher pressure washer. These can usually be found in the accessory compartment or packaging.
Step 2: Take hold of the spray wand and locate the nozzle attachment point. The attachment point is usually located at the end of the spray wand.
Step 3: Align the nozzle with the attachment point on the spray wand. The nozzle will typically have a tab or groove that fits into the attachment point.
Step 4: Push the nozzle firmly into the attachment point on the spray wand until it clicks or locks into place. You should feel a slight resistance when attaching the nozzle, ensuring a secure connection.
Step 5: Give the nozzle a gentle tug to ensure it is securely attached to the spray wand. It should not come loose or disconnect easily.
Step 6: Once the nozzle is attached, you can adjust the spray pattern by rotating the nozzle or using any adjustable settings on the spray wand.
Step 7: You are now ready to use your Karcher pressure washer with the spray wand and nozzle attached. Ensure that all connections are secure and begin cleaning.
Note: It is important to follow the manufacturer’s instructions and guidelines when attaching the spray wand and nozzle. Be sure to refer to the user manual for any specific details or precautions.
Fill the Pressure Washer with Water and Start Testing
Now that you have successfully assembled your Karcher pressure washer, it’s time to fill it with water and start testing it to ensure it is working properly. Here are the steps you need to follow:
- Locate the water inlet on the pressure washer. This is usually a hose connection located at the back of the unit.
- Connect one end of a garden hose to a water source, such as an outdoor faucet.
- Attach the other end of the garden hose to the water inlet on the pressure washer. Make sure it is tightened securely.
- Open the water source valve to allow water to flow into the pressure washer.
- Make sure the pressure washer’s power switch is in the “Off” position before plugging it into an electrical outlet.
- Plug the pressure washer into a properly grounded electrical outlet.
- Turn the pressure washer on by flipping the power switch to the “On” position.
- Allow the pressure washer to run for a few minutes to prime the system and remove any air bubbles.
- Inspect the connections and hoses for any leaks or damage. If you notice any leaks, turn off the pressure washer and tighten the connections.
- Once the pressure washer is running smoothly without any leaks, you can start testing it by spraying water onto a surface.
- Adjust the pressure settings on the pressure washer if necessary and test the spray patterns to ensure they meet your needs.
Remember to always read the user manual provided by Karcher for specific instructions and safety guidelines. With proper care and maintenance, your Karcher pressure washer will provide you with the power and performance you need for all your cleaning tasks.
Question-answer
Can I put together a Karcher pressure washer by myself?
Yes, you can put together a Karcher pressure washer by yourself. The process is fairly simple and straightforward, and the instructions provided by the manufacturer are usually easy to follow. However, it is always recommended to read the manual thoroughly and follow the steps carefully to ensure safe and proper assembly.
What tools do I need to put a Karcher pressure washer together?
To put a Karcher pressure washer together, you will typically need a few basic tools such as a Phillips screwdriver, an adjustable wrench, and sometimes a socket wrench. Additionally, the pressure washer may come with specific tools or accessories that are required for assembly, which will be mentioned in the user manual. It is important to have the necessary tools ready before starting the assembly process.
How long does it usually take to put a Karcher pressure washer together?
The time it takes to put a Karcher pressure washer together can vary depending on your familiarity with the product and experience with assembling similar equipment. On average, it can take anywhere from 30 minutes to an hour to assemble the pressure washer properly. However, it is recommended to allocate some additional time for reading the manual thoroughly and ensuring that all the parts are properly installed.
What should I do if I encounter difficulties or have questions during the assembly process?
If you encounter any difficulties or have questions during the assembly process of a Karcher pressure washer, the first step is to carefully read the user manual provided by the manufacturer. The manual will contain detailed instructions, troubleshooting tips, and frequently asked questions that can help you overcome any challenges you might face. If the manual does not provide the necessary information, you can contact Karcher’s customer service for further assistance and clarification.