
Blog
How To Fix A Leaking Pressure Washer Wand
If you own a pressure washer, you know how important it is to keep it in good working condition. One common problem that many pressure washer owners encounter is a leaking wand. A leaking wand can be a frustrating issue, as it can reduce the effectiveness of your pressure washer and waste water. However, with a few simple steps, you can fix a leaking pressure washer wand and get back to your cleaning tasks.
The first step in fixing a leaking pressure washer wand is to identify the source of the leak. The most common cause of a leaking wand is a damaged or worn-out o-ring. The o-ring is a small rubber ring that creates a watertight seal between the wand and the gun. Over time, this ring can become worn or damaged, leading to leaks.
To fix a leaking wand, start by removing the wand from the gun. Inspect the o-ring for any signs of wear or damage. If you notice any cracks or tears in the o-ring, it will need to be replaced. You can find replacement o-rings at most hardware stores or online. Once you have a new o-ring, lubricate it with a silicone-based lubricant to ensure a tight seal.
Next, carefully slide the new o-ring onto the wand and position it in the groove where the old o-ring was. Make sure the o-ring sits flush and is not twisted or pinched. Once the o-ring is in place, reattach the wand to the gun, making sure it is securely fastened. Turn on the pressure washer and check for any leaks. If the wand is still leaking, you may need to repeat the process or consider replacing the entire wand.
By following these simple steps, you can easily fix a leaking pressure washer wand and ensure your pressure washer is working at its best. Remember to regularly inspect and maintain your pressure washer to prevent future leaks and keep your equipment in top shape.


Identifying the Problem
Before attempting to fix a leaking pressure washer wand, it is important to identify the cause of the problem. There could be several reasons why your pressure washer wand is leaking:
|
Worn or damaged O-rings: Check the O-rings on your pressure washer wand for signs of wear or damage. O-rings are small rubber seals located inside the wand that help create a watertight seal. If the O-rings are worn or damaged, they may need to be replaced.
Trending Now
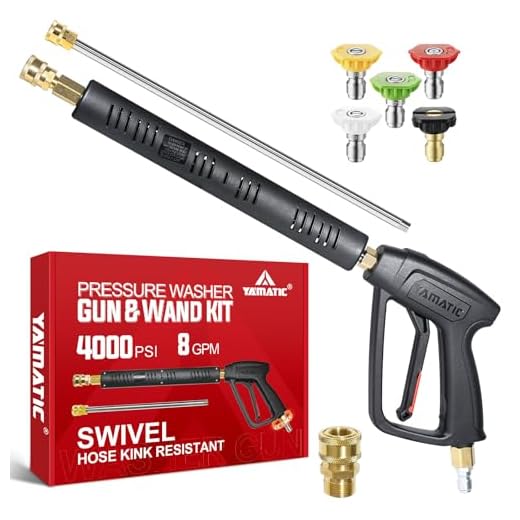
YAMATIC Pressure Washer Gun with Swivel Innovative swivel design for efficiency
This pressure washer gun features a 360-degree swivel inlet, enhancing maneuverability and efficiency during cleaning tasks. Durable and versatile, it's perfect for cars, windows, and more.
|
Loose connections: Inspect the connections on your pressure washer wand to ensure they are tight. Loose connections can cause leaks. Use a wrench to tighten any loose fittings. |
|
Clogged nozzle: A clogged nozzle can cause the pressure to build up in the wand, leading to leaks. Remove the nozzle from the wand and clean it thoroughly using a needle or a small brush. |
Cracked or damaged wand: Inspect the wand for any cracks or signs of damage. A cracked or damaged wand can cause leaks. If you notice any damage, consider replacing the wand. |
|
Improper use:
Top Rated
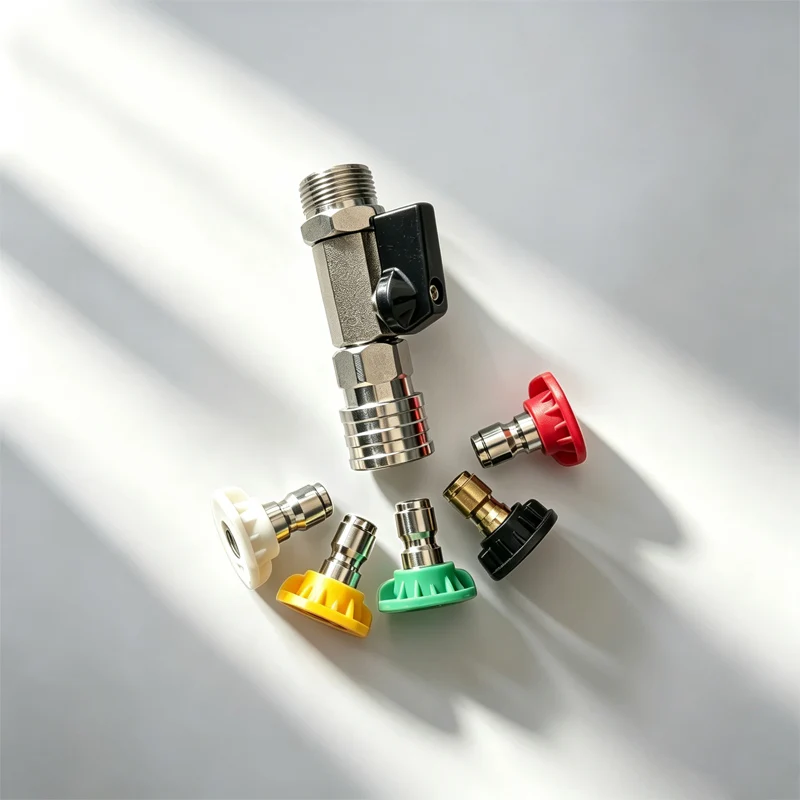
M22 High Pressure Washer Ball Valve Control water flow efficiently and easily
This high-pressure ball valve offers quick connection and easy control of water flow for power washer hoses, making cleaning tasks more manageable and efficient.
If you are experiencing leaks, it is important to consider whether you are using the pressure washer wand correctly. Make sure you are using the appropriate setting and technique for the task at hand. |
Other factors: Other factors, such as a damaged hose, worn seals, or a faulty pressure washer pump, can also cause leaks. It may be necessary to inspect these components as well. |
Once you have identified the cause of the leak, you can take the necessary steps to fix the problem and get your pressure washer wand working properly again.
Checking for Loose Connections
One common cause of a leaking pressure washer wand is loose connections. Over time, the connections between the wand, hose, and trigger can become loose, causing water to leak out. Before attempting any repairs, it’s important to check for loose connections and tighten them if necessary.
Steps to Check for Loose Connections:
- Turn off the pressure washer and disconnect it from the power source.
- Inspect the connection between the wand and the hose. Look for any signs of looseness or gaps.
- If there are gaps or signs of looseness, use an adjustable wrench to tighten the connection. Ensure it is tightened securely but not overly tight to avoid damage.
- Next, inspect the connection between the hose and the trigger. Again, look for any signs of looseness or gaps.
- Tighten the connection between the hose and the trigger using an adjustable wrench if necessary.
- After tightening all connections, turn on the pressure washer and run it for a few minutes while checking for any leaks. If there are no leaks, then the loose connections were likely the cause of the problem.
By checking and tightening the connections on your pressure washer wand, you can often fix the issue of a leaking wand without needing further repairs. However, if the problem persists after checking for loose connections, it may be necessary to explore other potential causes.
Inspecting the O-rings
One of the most common causes of a leaking pressure washer wand is a damaged or worn O-ring. O-rings are small rubber gaskets that create a tight seal between the wand and the nozzle. Over time, these O-rings can become cracked or deteriorated, causing water to leak out.
To inspect the O-rings, start by turning off the pressure washer and disconnecting the wand from the hose. Look for any visible signs of damage or wear on the O-rings. This could include cracks, tears, or flattened areas. If you notice any of these issues, it’s likely that the O-rings need to be replaced.
Additionally, you can use your fingers to touch and feel the O-rings for any softness or irregular shapes. If the O-rings feel dry, hard, or out of shape, they should be replaced. It’s also a good idea to inspect the O-ring grooves on both the wand and the nozzle for any dirt, debris, or buildup that could prevent a proper seal.
Tip: If the O-rings appear to be in good condition, try lubricating them with silicone grease before reassembling the wand. This can help improve their lifespan and create a better seal.
Replacing the O-rings
If you determine that the O-rings are damaged and need to be replaced, you can find replacement O-rings at most hardware stores or online. Make sure to take note of the specific O-ring size and material needed for your pressure washer wand.
To replace the O-rings, start by carefully removing the old O-rings with a small screwdriver or pick. Clean the O-ring grooves on the wand and nozzle with a soft cloth and some mild cleaner. Once clean, apply a thin layer of silicone grease to the new O-rings and place them into the grooves.
Carefully reattach the wand to the hose and tighten the connection. Turn on the pressure washer and check for any signs of leakage. If there are no more leaks, you can continue using your pressure washer. If the leaking persists, it may be necessary to seek professional assistance or consider replacing the wand altogether.
Remember, regular inspection and maintenance of your pressure washer wand, including the O-rings, can help prevent leaks and keep your pressure washer running smoothly.
Replacing the O-rings
If you have determined that the O-rings on your pressure washer wand are the source of the leak, you will need to replace them. Replacing the O-rings is a relatively simple process that can be done in a few easy steps. Here’s how:
-
Gather the necessary materials
Before you begin, make sure you have all the tools and materials you need. You will need a new set of O-rings, a wrench, and a soft cloth or towel for cleaning.
-
Turn off and disconnect the pressure washer
For safety reasons, always turn off and disconnect the pressure washer from the power source before working on any part of it. This will prevent any accidental starts and potential injuries.
-
Remove the old O-rings
Using a wrench, carefully unscrew the collar of the pressure washer wand. Once the collar is removed, you will have access to the old O-rings. Gently remove the old O-rings with your fingers or a small tool. Be careful not to damage the wand or the O-ring groove.
-
Clean the O-ring groove and wand
With a soft cloth or towel, clean the O-ring groove and the wand to remove any dirt, debris, or residue. It’s important to have a clean surface for installing the new O-rings to ensure a proper seal.
-
Install the new O-rings
Take the new O-rings and place them in the groove on the wand. Make sure they are properly seated and fit snugly. You can use a small tool or your fingers to press them into place.
-
Tighten the collar
Once the new O-rings are installed, carefully screw the collar back onto the wand. Use a wrench to tighten it securely, but be careful not to overtighten, as this can cause damage.
-
Test for leaks
After replacing the O-rings, reconnect the pressure washer and turn it on. Test the wand for any signs of leakage. If there are still leaks, you may need to repeat the process or seek professional help.
By following these steps, you should be able to successfully replace the O-rings on your pressure washer wand and fix any leaks. Remember to always exercise caution and consult the manufacturer’s instructions or seek professional help if you encounter any difficulties.
Cleaning the Wand
If your pressure washer wand is leaking, it may be due to a build-up of dirt, debris, or other contaminants. Cleaning the wand can help remove any blockages and improve its performance. Here are the steps to clean the wand:
1. Disconnect the wand
Before cleaning the wand, make sure to turn off the pressure washer and disconnect the wand from the machine to ensure your safety.
2. Inspect the wand
Take a close look at the wand for any visible dirt or debris. Use a cloth or brush to remove any loose particles.
3. Remove the nozzle
Unscrew the nozzle from the end of the wand. This will allow you to clean the wand more thoroughly.
4. Rinse the wand
Using a hose or bucket of water, rinse the entire wand to remove any remaining dirt or debris. Pay close attention to the nozzle attachment point and any other areas where debris may accumulate.
5. Clean the nozzle
While the nozzle is detached, use a small brush or toothpick to clean out any clogs or blockages. Be gentle to avoid damaging the nozzle.
6. Reassemble the wand
Once the wand and nozzle are clean, reattach the nozzle to the end of the wand. Make sure it is tightly secured to prevent any future leaks.
Cleaning the wand regularly can prevent leaks and prolong the lifespan of your pressure washer. Remember to always wear protective gloves and eyewear when handling the wand and pressure washer.
Testing the Pressure Washer Wand
After making repairs or adjustments to your pressure washer wand, it’s important to test it to ensure it’s working properly. This will help you determine if the leaking issue has been resolved or if further repairs are necessary.
Here’s how you can test your pressure washer wand:
1. Safety First: Before testing, ensure that you have taken the necessary safety precautions. Wear protective gear such as gloves and safety goggles to protect yourself from potential injuries.
2. Connect the Wand to the Pressure Washer: Attach the pressure washer wand to the pressure washer itself. Make sure the connections are tight and secure to prevent any leaks.
3. Turn on the Pressure Washer: Start the pressure washer and wait for it to build up pressure. Once the pressure has built up, you can proceed with testing.
4. Inspect for Leaks: Carefully inspect the wand for any signs of leaks. Check all the joints, valves, and connections for any water dripping or spraying out. If you notice any leaks, turn off the pressure washer and address the issue before proceeding.
5. Test the Spray Patterns: Point the wand nozzle away from yourself and any objects or people and squeeze the wand trigger. Observe the spray pattern produced by the wand. It should be consistent and strong.
6. Check for Pressure Loss: While testing the spray patterns, pay attention to any pressure loss. If the pressure drops significantly or if you notice a sudden decrease in power, it could indicate a problem with the wand or the pressure washer itself.
7. Adjustments and Further Testing: If you encounter any issues during the testing process, make the necessary adjustments or repairs as needed. Once you have made the adjustments, repeat the testing process to ensure that the wand is no longer leaking and working properly.
By following these steps, you can properly test your pressure washer wand and identify any issues. It’s important to address leaking problems promptly to prevent further damage and ensure the optimal performance of your pressure washer.
Questions and answers,
Why is my pressure washer wand leaking?
If your pressure washer wand is leaking, it could be due to a few different issues. One possible cause is a damaged or worn-out O-ring that needs to be replaced. Another possibility is a cracked or damaged wand that needs to be repaired or replaced. Additionally, the wand may not be properly connected to the pressure washer, which can also cause leaks.
How can I determine the cause of the leak in my pressure washer wand?
To determine the cause of the leak in your pressure washer wand, you can start by inspecting the O-ring. If you see any signs of damage or wear, it will need to be replaced. You should also inspect the wand for any cracks or other damage. If the wand is damaged, it may need to be repaired or replaced. Additionally, check that the wand is securely connected to the pressure washer, as a loose connection can also cause leaks.
Can I fix a leaking pressure washer wand myself?
Yes, you can often fix a leaking pressure washer wand yourself. If the issue is a damaged or worn-out O-ring, you can purchase a replacement O-ring and replace it yourself. If the wand is cracked or damaged, you may be able to repair it with a bonding adhesive or replace it entirely. However, if you are unsure of how to address the issue or if the leak persists after attempting repairs, it may be best to consult a professional.
What tools will I need to fix a leaking pressure washer wand?
The tools you will need to fix a leaking pressure washer wand will depend on the specific issue you are addressing. If you are replacing an O-ring, you may need a small wrench or pliers to remove the old O-ring and install the new one. If you are repairing a crack in the wand, you may need a bonding adhesive and sandpaper for preparation. It is also a good idea to have a bucket or container to catch any water that may leak during the repair process.
When should I consider replacing my pressure washer wand instead of trying to fix it?
In some cases, it may be more practical or cost-effective to replace your pressure washer wand instead of trying to fix it. If the wand is severely cracked or damaged, it may be difficult or impossible to repair. Additionally, if you have already attempted repairs and the leak persists, it may be a sign that the wand is beyond repair. In these situations, it is best to invest in a new wand to ensure proper functioning and avoid further issues.
What could be causing my pressure washer wand to leak?
There are several potential causes for a leaking pressure washer wand. It could be due to a damaged or worn-out o-ring, a cracked or broken wand, or a loose connection between the wand and the pressure washer hose.
How can I fix a leaking pressure washer wand?
To fix a leaking pressure washer wand, you can start by checking the o-rings for any damage or wear. If they are worn out, you can replace them with new ones. If the wand itself is cracked or broken, you may need to replace the entire wand. Additionally, make sure that the connection between the wand and the pressure washer hose is tight and secure.