
Blog
How To Connect Foam Cannon To Ryobi Pressure Washer


Connecting a foam cannon to your Ryobi pressure washer is a great way to enhance your car-washing experience. A foam cannon allows you to cover your vehicle in a thick layer of foamy soap, which helps to remove dirt and grime more effectively. With the right equipment and a few simple steps, you can easily attach a foam cannon to your Ryobi pressure washer and start enjoying the benefits of a professional car wash at home.
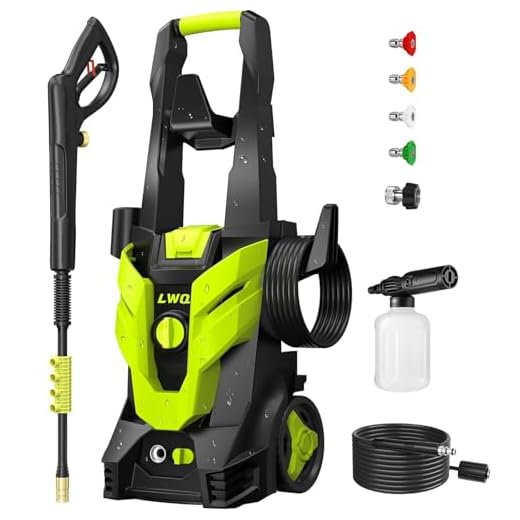
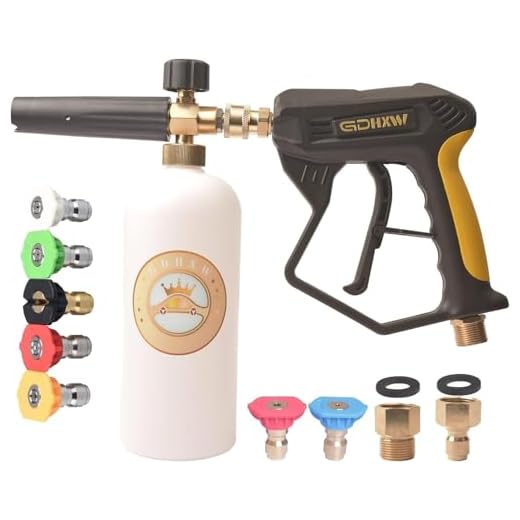
Step 1: Before you begin, make sure you have all the necessary equipment. You will need a foam cannon, a foam cannon adapter, and a Ryobi pressure washer. It is important to ensure that the foam cannon and adapter you purchase are compatible with your specific model of Ryobi pressure washer.
Step 2: Start by turning off your pressure washer and disconnecting any attachments or accessories that are currently connected to it. This will ensure a safe and clean working environment for connecting the foam cannon.
Step 3: Attach the foam cannon adapter to the end of the pressure washer wand. The adapter should have a threaded connection that will easily screw onto the wand. Make sure it is tightened securely to prevent any leaks during operation.
Step 4: Once the foam cannon adapter is securely attached, you can now attach the foam cannon itself. Simply twist the foam cannon securely onto the adapter until it is tight and snug. Again, ensure that it is tightened properly to avoid any leaks.
Step 5: To test the connection and adjust the foam settings, turn on your pressure washer and squeeze the trigger to release water. You should see a thick, foamy stream of soap coming out of the foam cannon nozzle. If the foam is too thin or thick, you can adjust the foam concentration using the controls on the cannon.
Remember to always read and follow the manufacturer’s instructions for your specific foam cannon and pressure washer to ensure safe and proper operation. With the right setup, you will be able to enjoy a high-quality foam wash that will leave your car looking shiny and clean.
Simplified Steps to Connect Foam Cannon to Your Ryobi Pressure Washer
If you want to enhance your cleaning capabilities with your Ryobi pressure washer, connecting a foam cannon is a great way to achieve that. A foam cannon allows you to apply a thick layer of foam detergent to your surfaces, ensuring a more effective and thorough cleaning. Here are the simplified steps to connect a foam cannon to your Ryobi pressure washer:
| Step | Description |
|---|---|
| 1 | Make sure your Ryobi pressure washer is turned off and unplugged before starting the installation process. |
| 2 | Locate the soap dispenser inlet on your pressure washer. It is usually located at the back of the machine near the pressure hose. |
| 3 | Remove the cap or plug from the soap dispenser inlet. This will expose the threaded connection where the foam cannon will be attached. |
| 4 | Take your foam cannon and identify the connector at the bottom. This connector should have threads that match the soap dispenser inlet. |
| 5 | Screw the foam cannon onto the soap dispenser inlet in a clockwise direction. Make sure it is securely tightened to prevent any leaks. |
| 6 | Once the foam cannon is connected, fill the foam cannon reservoir with your desired foam detergent. Follow the manufacturer’s instructions for the appropriate dilution ratio. |
| 7 | Turn on your Ryobi pressure washer and engage the soap or detergent setting. This will allow the pressurized water to mix with the foam detergent and create a thick, foamy solution. |
| 8 | You are now ready to start cleaning with your foam cannon attached to your Ryobi pressure washer. Begin by spraying the foam onto the desired surface and let it sit for a few minutes to allow the detergent to work its magic. |
Following these simplified steps will help you seamlessly connect a foam cannon to your Ryobi pressure washer, allowing you to achieve a higher level of cleanliness and efficiency in your cleaning tasks. Happy cleaning!
Step 1: Gathering the Necessary Tools
Before you can connect a foam cannon to your Ryobi pressure washer, you’ll need to gather a few tools and materials:
1. Foam cannon
The first thing you’ll need is a foam cannon attachment. This is a specialized nozzle that attaches to the end of your pressure washer wand and is designed specifically for dispensing foam. You can find foam cannons at a variety of retailers, both in-store and online.
2. Ryobi pressure washer
This process assumes that you already have a Ryobi pressure washer. If you don’t, you’ll need to purchase or borrow one before moving forward.
3. Quick-connect fitting
In order to attach the foam cannon to your pressure washer, you’ll need a quick-connect fitting. This is a small, brass connector that allows you to easily attach and detach accessories to your pressure washer wand.
4. Teflon tape
To ensure a proper seal and prevent any leaks, it’s a good idea to have some Teflon tape on hand. This tape can be wrapped around the threads of the quick-connect fitting to create a tight seal.
Once you have gathered these tools and materials, you’ll be ready to move on to the next step of connecting the foam cannon to your Ryobi pressure washer.
Step 2: Preparing Your Pressure Washer and Foam Cannon
Before connecting the foam cannon to your Ryobi pressure washer, there are a few steps you need to follow to ensure a successful setup.
1. Check the compatibility: Make sure that your Ryobi pressure washer is compatible with a foam cannon attachment. Check the device’s instruction manual or consult the manufacturer to verify compatibility.
2. Assemble the foam cannon: Take your foam cannon and attach the bottle to the bottom of the cannon. Make sure it is securely tightened to avoid leaks during operation.
3. Adjust the foam cannon dial: The foam cannon usually has a dial or knob that allows you to adjust the amount of foam produced. Turn the dial to the desired setting according to your preference.
4. Attach the foam cannon to the pressure washer: Locate the nozzle on your pressure washer, which is usually located near the wand. Remove the nozzle by twisting it counterclockwise.
5. Install the foam cannon: Take the foam cannon and align the threaded end with the nozzle opening on the pressure washer. Gently twist the foam cannon clockwise to attach it securely. Make sure it is tightened properly to prevent any leaks.
6. Secure the foam cannon: Once the foam cannon is attached, make sure it is stable and securely connected to the pressure washer. Check for any loose connections or wobbling before use.
Note: It is important to follow the manufacturer’s instructions for your specific pressure washer and foam cannon to avoid any potential damage or accidents. Always remove the foam cannon before using the pressure washer without it.
Step 3: Attaching the Foam Cannon to Your Ryobi Pressure Washer
Once you have assembled your foam cannon according to the manufacturer’s instructions and have prepared your desired foam solution, it’s time to attach the foam cannon to your Ryobi pressure washer. Follow these steps:
- Locate the spray gun on your Ryobi pressure washer. The spray gun is typically attached to the end of the pressure washer wand.
- Twist and remove the nozzle from the spray gun. This will expose the threaded connection on the spray gun.
- Take the foam cannon and locate the brass connector on the bottom. This connector is usually covered by a plastic cap.
- Remove the plastic cap from the brass connector and expose the threaded connection.
- Align the threaded connection on the foam cannon with the threaded connection on the spray gun.
- Once aligned, begin twisting the foam cannon onto the spray gun. Be sure to hand-tighten it until it is securely in place. Avoid using excessive force, as this may cause damage to the connections.
- Once the foam cannon is attached, double-check that it is tightly secured and properly aligned with the spray gun.
Congratulations! You have successfully attached the foam cannon to your Ryobi pressure washer. You are now ready to start using your pressure washer to create thick, foamy suds for all your cleaning needs. Remember to always follow the manufacturer’s instructions and guidelines when using your pressure washer and foam cannon. Happy cleaning!
Step 4: Testing and Adjusting the Foam Cannon
Now that you have successfully connected the foam cannon to your Ryobi pressure washer, it’s time to test it out and make any necessary adjustments to achieve the desired foam consistency.
Start by filling the foam cannon reservoir with your preferred car shampoo or detergent. Make sure not to overfill to avoid any leaks during operation.

Next, attach the foam cannon to the spray gun of your pressure washer. Ensure that it is securely connected to prevent any accidental detachment while in use.
Once everything is set up, turn on the pressure washer and trigger the spray gun to release the foam. The foam cannon will suck in air and emit the shampoo or detergent solution in a foamy consistency.
If you find that the foam is too thick or too thin, you can adjust the foam cannon settings to achieve the desired foam consistency. Most foam cannons have adjustable knobs or dials that control the amount of foam produced.
Start by turning the knob or dial clockwise to increase the foam thickness and counter-clockwise to reduce it. Test the foam consistency after each adjustment until you reach the desired result.
Keep in mind that the ideal foam consistency may vary based on personal preference and the cleaning task at hand. You may need thicker foam for heavy-duty cleaning, while a thinner foam may be sufficient for lighter cleaning tasks.
Once you have achieved the desired foam consistency, you’re ready to start using the foam cannon with your Ryobi pressure washer. Enjoy the convenience and efficiency of the foam cannon for effective and enjoyable cleaning.
Questions and answers
What is a foam cannon?
A foam cannon is an attachment used with pressure washers to generate thick foam for car washes or cleaning tasks. It helps to evenly distribute the soap or detergent over the surface, ensuring a thorough and efficient cleaning.

Can I connect a foam cannon to my Ryobi pressure washer?
Yes, you can connect a foam cannon to your Ryobi pressure washer. Ryobi pressure washers typically come with a standard quick-connect nozzle system, which allows you to easily attach various accessories, including a foam cannon.
How do I connect a foam cannon to my Ryobi pressure washer?
To connect a foam cannon to your Ryobi pressure washer, you will first need to remove the current nozzle from your lance or wand. Then, attach the foam cannon’s quick-connect adapter to the end of the lance or wand. Once securely attached, you can then fill the foam cannon with the desired soap or detergent and start the pressure washer. The water flow will mix with the soap or detergent in the foam cannon, creating a thick foam for your cleaning tasks.
Do I need any additional adapters to connect a foam cannon to my Ryobi pressure washer?
No, you do not need any additional adapters to connect a foam cannon to your Ryobi pressure washer. Ryobi pressure washers usually come with a standard quick-connect nozzle system that is compatible with most foam cannons available on the market. However, it is always a good idea to check the compatibility of the foam cannon with your specific Ryobi model before making a purchase.
Recent Posts
-

How To Connect Soap To Honda Pressure Washer
June 28, 2024 -

A To Z Pressure Washing Scam
June 27, 2024 -

How To Pressure Wash Your Home With A Garden Hose
June 27, 2024 -

Where Can I Buy Honda Pressure Washer Parts
June 25, 2024 -
