
Blog
How To Connect 2 Hoses Together On Simpson Pressure Washer
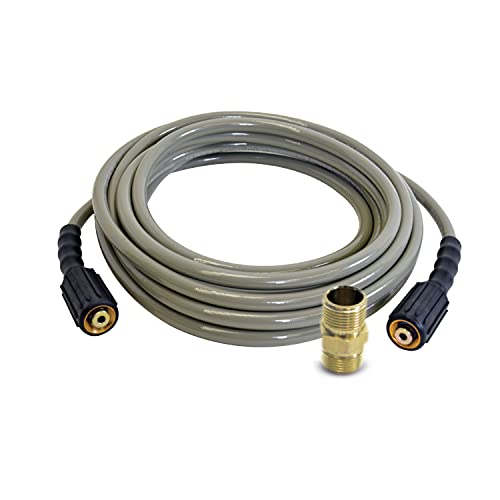

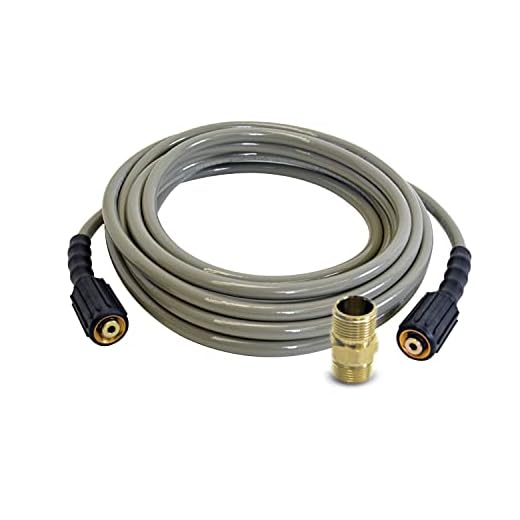


Connecting two hoses together on a Simpson pressure washer can be a useful solution when you need to extend the reach of your pressure washer or connect multiple hoses for a larger job. By properly connecting the hoses, you can ensure a continuous flow of water and maintain the strong pressure needed for effective cleaning.
Step 1: Check the compatibility of the hoses
Before connecting two hoses together, it’s important to check if they are compatible. Ensure that both hoses have the same diameter and pressure rating. It’s also crucial to verify that the connectors on each hose are compatible and can be securely attached to one another.
Step 2: Prepare the hoses for connection
Before connecting the hoses, thoroughly clean the connectors and ensure that they are free from any dirt or debris. This will help to create a tight seal and prevent any leaks.
Step 3: Connect the hoses
To connect the hoses, simply align the male connector on one hose with the female connector on the other hose. Push the connectors together until you hear a click or feel them securely lock into place. Give the hoses a gentle tug to ensure they are properly connected.

Step 4: Test for leaks
Once the hoses are connected, turn on the water supply and run the pressure washer. Check for any leaks around the connection points. If you notice any leaks, double-check the connection and tighten it if necessary.
Step 5: Start cleaning
With the two hoses securely connected, you are now ready to start cleaning. Begin by adjusting the pressure settings on your pressure washer to suit your cleaning needs. Remember to follow the manufacturer’s instructions and use caution when operating the pressure washer.
By following these simple steps, you can easily connect two hoses together on a Simpson pressure washer. This will give you the flexibility to tackle larger cleaning projects and extend the reach of your pressure washer.
Connecting 2 Hoses Together on Simpson Pressure Washer
If you’re looking to extend the reach of your Simpson pressure washer, connecting 2 hoses together can be a great solution. Whether you need to clean a large area or reach higher surfaces, connecting hoses allows for more flexibility and convenience.
To connect 2 hoses together on a Simpson pressure washer, follow these simple steps:
- Turn off the pressure washer: Before making any hose connections, always turn off the pressure washer and disconnect it from the power source for safety.
- Inspect the hoses: Check both hoses for any damage or wear. Make sure there are no leaks or cuts that could affect the performance of the pressure washer.
- Prepare the hoses: If your hoses have connectors with fittings, remove them by twisting counterclockwise. This will allow you to easily connect the hoses together.
- Connect the hoses together: Take one end of the first hose and attach it securely to the other end of the second hose. Twist clockwise until tight to ensure a secure connection.
- Check for leaks: Once the hoses are connected, turn on the pressure washer and check for any leaks. If you notice any leaks, tighten the connections or replace any damaged parts.
- Test the pressure washer: After ensuring the hoses are securely connected and there are no leaks, test the pressure washer to make sure it’s functioning properly. Start with low pressure and gradually increase if necessary.
- Proper storage: When you’re finished using the pressure washer, disconnect the hoses and store them properly to prevent damage. Coiling the hoses loosely and keeping them in a dry place is recommended.
By following these steps, you should be able to successfully connect 2 hoses together on your Simpson pressure washer. Remember to always prioritize safety and proper maintenance to ensure the longevity of your equipment.
Step-by-Step Guide
Connecting two hoses together on your Simpson pressure washer is a simple process that can be done in a few easy steps. Follow this step-by-step guide to ensure a secure and leak-free connection.
Step 1: Begin by inspecting the ends of both hoses. Make sure they are clean and free of debris or damage. Any debris or damage could compromise the connection and result in leaks.
Step 2: Take one end of the first hose and attach it firmly to the water outlet valve on the pressure washer. Twist the hose clockwise until it is hand-tight. Be sure not to overtighten, as this could damage the threading.
Step 3: Next, take the second hose and attach the other end to the remaining free end of the first hose. Align the threads and twist the connection clockwise until it is hand-tight. Again, avoid overtightening.
Step 4: Once both hoses are securely connected, check for any signs of leakage. Turn on the water supply and inspect the connection points for any water dripping or spraying out. If there are any leaks, tighten the connections further until the leaks stop.
Step 5: After ensuring a tight and leak-free connection, you can proceed to use your pressure washer as desired. Always monitor the connection points during use to ensure that they remain secure.
Note: If you experience persistent leaks even after tightening the connections, consider replacing the washers or consulting a professional for assistance.
By following these simple steps, you can easily connect two hoses together on your Simpson pressure washer and enjoy uninterrupted cleaning power. Remember to always prioritize safety and double-check the connections before each use. Happy cleaning!
Tips for a Secure Connection
To ensure a secure connection between two hoses on your Simpson pressure washer, follow these tips:
1. Choose the Right Adapter: Select an adapter that is compatible with the diameter and the type of hoses you are connecting. Using the wrong adapter can lead to leakage or an insecure connection.
2. Clean the Hoses: Before connecting the hoses, check for any dirt or debris that may be present. Clean the ends of the hoses thoroughly to ensure a tight and secure connection.
3. Lubricate the Threads: Apply a small amount of lubricant, such as plumber’s grease or silicone grease, to the threads of the adapter and the hoses. This will help to create a smoother connection and reduce the likelihood of leaks.
4. Tighten with Tools: Use adjustable pliers or a wrench to tighten the adapter and hoses. Ensure that they are securely fastened, but be careful not to overtighten, as this can damage the fittings.
5. Test for Leaks: After connecting the hoses, turn on the water supply and check for any signs of leakage. If you notice any leaks, double-check the connection and make any necessary adjustments to achieve a secure seal.
6. Regularly Inspect the Connection: Periodically inspect the connection between the hoses to ensure that it remains secure. If you notice any signs of wear or damage, replace the hoses or the adapters as needed.
Following these tips will help you achieve a secure and leak-free connection between two hoses on your Simpson pressure washer, allowing you to effectively tackle your cleaning tasks.
Advantages of Using 2 Hoses
Connecting 2 hoses to your Simpson pressure washer can provide several advantages. Here are a few reasons why using 2 hoses can be beneficial:
1. Extended Reach
By connecting 2 hoses together, you can significantly extend the reach of your pressure washer. This is especially useful if you need to clean a larger area or if the water source is far from the area you want to clean. With the extra length, you can easily reach these remote areas without having to move the pressure washer.
2. Increased Flexibility
Having 2 hoses connected gives you more flexibility in terms of maneuverability. You can easily navigate around obstacles or tight spaces without having to worry about the length of the hose. This allows you to clean efficiently and effectively without any limitations.
3. Enhanced Water Flow
Using 2 hoses can also improve the water flow and pressure of your pressure washer. By connecting two hoses, you create a larger diameter for water to flow through, which can increase the overall water flow rate. This means you can clean faster and more efficiently, saving you time and effort.
Overall, connecting 2 hoses to your Simpson pressure washer can provide extended reach, increased flexibility, and enhanced water flow. These advantages can greatly improve the performance and efficiency of your pressure washer, making your cleaning tasks easier and more effective.
| Advantages of Using 2 Hoses: |
|---|
| Extended reach |
| Increased flexibility |
| Enhanced water flow |
Common Mistakes to Avoid
When connecting two hoses together on a Simpson pressure washer, there are some common mistakes that should be avoided to ensure proper operation and to prevent any damage to your equipment.
1. Using Incompatible Hoses
One of the most common mistakes is using incompatible hoses when connecting them together. It is important to ensure that the hoses you are connecting are of the same size and have compatible fittings. Using hoses that are not compatible can result in leaks, reduced water flow, and may even damage your pressure washer.

2. Over-tightening the Connections
Another mistake to avoid is over-tightening the connections. While it is essential to make sure that the hoses are securely connected, over-tightening can cause damage to the fittings and may lead to leaks. It is recommended to tighten the connections firmly by hand and then give them an additional quarter-turn with pliers.
3. Ignoring the Pressure Rating
Ignoring the pressure rating of the hoses is another mistake that should be avoided. Each hose has a maximum operating pressure, and connecting hoses with different pressure ratings can result in leaks or even bursting of the hoses. Always make sure that the pressure rating of the hoses you are connecting is suitable for your pressure washer.
By avoiding these common mistakes, you can ensure a secure and leak-free connection between two hoses on your Simpson pressure washer.
Questions and answers,
What is a Simpson pressure washer?
A Simpson pressure washer is a high-powered cleaning machine that uses water pressure to remove dirt, grime, and other debris from surfaces.
Why would I need to connect 2 hoses together on a Simpson pressure washer?
You may need to connect 2 hoses together on a Simpson pressure washer if you need to reach a larger area or if you need to clean a surface that is far away from the water source.

How do I connect 2 hoses together on a Simpson pressure washer?
To connect 2 hoses together on a Simpson pressure washer, you will need a hose connector. Attach one end of the connector to the first hose and the other end to the second hose. Make sure the connection is secure to avoid any leaks.
Can I use any type of hose connector to connect 2 hoses on a Simpson pressure washer?
No, it is important to use a hose connector that is compatible with the specific model of Simpson pressure washer. Using an incompatible connector could result in leaks or damage to the pressure washer.
Are there any precautions I should take when connecting 2 hoses together on a Simpson pressure washer?
Yes, it is important to ensure that the hoses are not twisted or kinked when connecting them together. Twisted or kinked hoses can restrict water flow and reduce the effectiveness of the pressure washer. Additionally, always check for any leaks before using the pressure washer.
Can I connect two hoses together on my Simpson pressure washer?
Yes, you can connect two hoses together on your Simpson pressure washer. This can be useful if you need extra length to reach a certain area.
Recent Posts
-

How To Connect Soap To Honda Pressure Washer
June 28, 2024 -

A To Z Pressure Washing Scam
June 27, 2024 -

How To Pressure Wash Your Home With A Garden Hose
June 27, 2024 -

Where Can I Buy Honda Pressure Washer Parts
June 25, 2024 -
