
Blog
How To Assemble Kawasaki Pressure Washer


Assembling a Kawasaki pressure washer can seem like a daunting task, but with the right instructions, it can be a breeze. Whether you’re a seasoned DIYer or a beginner, this guide will walk you through the steps to ensure that your pressure washer is assembled correctly and ready to tackle any cleaning project.
Step 1: Unboxing and preparation
Before you begin assembling your Kawasaki pressure washer, make sure you have all the necessary parts and tools. Carefully unbox your pressure washer and remove any protective packaging. Take a moment to familiarize yourself with the different components and their functions.
Step 2: Attaching the handle
Start by locating the handle and the corresponding mounting points on the pressure washer. Align the handle with the mounting points and securely fasten it using the provided screws or bolts. Double-check that the handle is firmly attached and doesn’t wobble.
Step 3: Installing the spray gun and hose
Next, locate the spray gun and the hose. Connect one end of the hose to the spray gun and tighten the connection. Attach the other end of the hose to the pressure washer’s water outlet. Make sure all connections are tight and secure.
Step 4: Connect the water supply
Now it’s time to connect the water supply to your pressure washer. Locate the water inlet on the pressure washer and connect the hose from your water source to it. Ensure the connection is tight to prevent any leaks.
Step 5: Checking for leaks and testing
Before you start using your Kawasaki pressure washer, it’s important to check for any leaks. Turn on the water supply and inspect all connections for leaks. Once you’re satisfied that everything is secure, you can test the pressure washer by turning it on and spraying water to ensure proper functionality.
By following these steps, you’ll have your Kawasaki pressure washer assembled and ready to use in no time. Remember to always read the manufacturer’s instructions for your specific model, as slight variations in assembly may exist. Happy cleaning!
What is a Kawasaki Pressure Washer?
A Kawasaki pressure washer is a high-pressure cleaning device manufactured by the Kawasaki Heavy Industries company. It is designed to efficiently remove dirt, grime, and other contaminants from a variety of surfaces. The pressure washer is powered by a gasoline engine or electric motor, which drives a pump to generate high-pressure water flow. This pressurized water is then directed through a nozzle or spray gun attachment to provide a concentrated stream or wider spray pattern, depending on the desired cleaning application.
Why Assemble a Kawasaki Pressure Washer Yourself?
Assembling a Kawasaki pressure washer yourself can be a rewarding and cost-effective choice. Here are a few reasons why:
1. Cost savings: By assembling the pressure washer yourself, you can save money on labor costs that would be incurred if you hired a professional for assembly. This makes the DIY option a more budget-friendly choice.
2. Understanding the machine: Assembling the pressure washer yourself allows you to gain a better understanding of its components and how they work together. This knowledge can be helpful if you ever need to troubleshoot or perform maintenance on the machine in the future.
3. Personal customization: When assembling the pressure washer, you have the freedom to choose and install any optional accessories or parts that you may want. This allows you to customize the machine to best suit your specific needs and preferences.
4. Building confidence: Assembling a complex machine like a pressure washer can be a challenging task, but completing it successfully can boost your confidence and give you a sense of accomplishment. This newfound confidence may motivate you to tackle other DIY projects in the future.
5. Learning experience: Assembling a Kawasaki pressure washer yourself provides an opportunity to learn new skills and techniques. From following instructions to using basic tools, the assembly process can be a valuable learning experience that helps you develop practical abilities.
Overall, assembling a Kawasaki pressure washer yourself can be a beneficial choice in terms of cost, customization, knowledge, and personal growth. So, if you’re up for the challenge, why not give it a try?
Tools Needed for Assembly
Assembling a Kawasaki pressure washer requires a few basic tools to ensure a smooth and successful assembly process. Before getting started, make sure you have the following tools at your disposal:
1. Screwdriver: A screwdriver is essential for tightening screws and secure various components of the pressure washer together. Make sure you have both a flathead and a Phillips screwdriver, as different parts may require different types of screws.
2. Adjustable wrench: An adjustable wrench is useful for tightening nuts and bolts. It allows you to easily adjust the size to fit different fasteners, saving you the hassle of using multiple wrenches.
3. Pliers: Pliers come in handy for gripping and holding small parts, as well as for bending wires or removing any stubborn components. A pair of long-nose pliers is particularly useful for reaching into tight spaces.
4. Allen wrench set: Many pressure washers come with components that require an Allen wrench for assembly. Make sure you have a set of Allen wrenches in various sizes to accommodate different fasteners.
5. Safety goggles: Safety goggles are necessary to protect your eyes from any debris or splashing water during the assembly process. Always prioritize safety and wear goggles throughout the assembly.
6. Work gloves: Work gloves provide protection for your hands while handling the pressure washer components. They can prevent injuries and offer a better grip when handling slippery or heavy parts.
Having these tools readily available will make the assembly process quicker and more efficient. It’s always a good idea to double-check your tools before starting the assembly, ensuring that you have everything you need for a successful assembly of your Kawasaki pressure washer.
Required Tools for Assembly
Before you begin assembling your Kawasaki pressure washer, make sure you have the following tools handy:
1. Screwdrivers
You will need both Phillips and flat-head screwdrivers to attach various parts of the pressure washer, such as the handle, wheels, and housing. Make sure you have different sizes of screwdrivers to accommodate different screws.
2. Wrenches
Having a set of wrenches will come in handy when tightening nuts, bolts, and fittings. You may need an adjustable wrench as well to handle parts with different sizes.
3. Pliers
Pliers are essential for gripping and bending wires or cables during the assembly process. Make sure you have both needle-nose and slip-joint pliers to handle different tasks.
4. Hex Keys
Hex keys, also known as Allen wrenches, are necessary for tightening hexagonal screws and bolts. Most pressure washers require hex keys for assembly, so ensure you have a set with various sizes.
5. Hammer
A hammer may be needed to secure parts with nails or to gently tap certain components into place. Keep a rubber mallet or a regular hammer with a soft striking surface to avoid damaging delicate parts.
Having these tools on hand will ensure a smooth assembly process for your Kawasaki pressure washer. Additionally, check the instruction manual provided with the pressure washer to see if any additional tools are required for specific parts or steps.
Optional Tools for Assembly
While the Kawasaki Pressure Washer comes with all the necessary tools for assembly, there are a few optional tools that you may find helpful during the process. These tools can make the assembly easier and more efficient:
| Tool | Description |
|---|---|
| Adjustable Wrench | An adjustable wrench can be useful for tightening nuts and bolts during assembly. It allows you to easily adjust the size of the wrench to fit different sizes of nuts and bolts. |
| Phillips Screwdriver | A Phillips screwdriver is often needed to tighten or loosen screws during assembly. It has a cross-shaped tip that fits into cross-shaped screw heads. |
| Pliers | Pliers can come in handy when you need to grip and twist small objects, such as wires or connectors, during assembly. They provide a firm grip and allow for precise control. |
| Rubber Mallet | A rubber mallet can be used to gently tap or knock parts into place during assembly. It can help with aligning parts and ensuring a secure fit without damaging the surfaces. |
| Extension Cord | If the electrical cord of the pressure washer is not long enough to reach the desired power outlet, an extension cord can be used to provide the necessary length. Make sure to use a heavy-duty extension cord that is suitable for outdoor use. |
While these tools are optional, having them on hand can save you time and make the assembly process smoother. However, be sure to follow the manufacturer’s instructions and use only the tools recommended for assembly to avoid damaging the pressure washer.
Step-by-Step Assembly Guide
Follow these simple steps to properly assemble your Kawasaki pressure washer:
Step 1: Unbox the pressure washer and remove all packaging materials.
Step 2: Locate the user manual and read through it to familiarize yourself with the different parts and components of the pressure washer.
Step 3: Attach the handle to the main body of the pressure washer. Ensure that it is securely fastened.
Step 4: Connect the high-pressure hose to the pressure washer. Make sure to tighten the connections to avoid any leaks.
Step 5: Attach the spray gun to the end of the high-pressure hose, and ensure that it is securely locked in place.
Step 6: Connect the appropriate nozzle to the spray gun. Different nozzles will provide different spray patterns, so choose the one that suits your cleaning needs.
Step 7: Fill the detergent tank with the desired cleaning solution, if applicable. Not all models have a detergent tank, so refer to the user manual to confirm.
Step 8: Connect the pressure washer to a water source using a garden hose. Ensure that the water supply is turned on.
Step 9: Plug in the pressure washer to a power outlet. Check the user manual for any specific electrical requirements.
Step 10: Turn on the pressure washer and test it to ensure that it is working properly. Check for any leaks or abnormal noises.
Step 11: Adjust the pressure and spray pattern as needed. Refer to the user manual for instructions on how to do this.
Step 12: Your Kawasaki pressure washer is now ready to use! Start cleaning and enjoy the benefits of a powerful and efficient cleaning tool.
Step 1: Unboxing and Inventory Check
Before starting the assembly process, it is important to unbox your Kawasaki pressure washer and perform an inventory check to ensure that you have received all the necessary components. This will ensure a smooth assembly process and avoid any delays or missing parts.
First, carefully remove the pressure washer from its packaging, ensuring not to damage any of the components. Lay out all the parts in a well-lit and organized workspace for easy access.
Inventory Check
Next, cross-check the components received with the inventory list provided in the instruction manual. This will help you verify that all the necessary parts are present and ready for assembly.
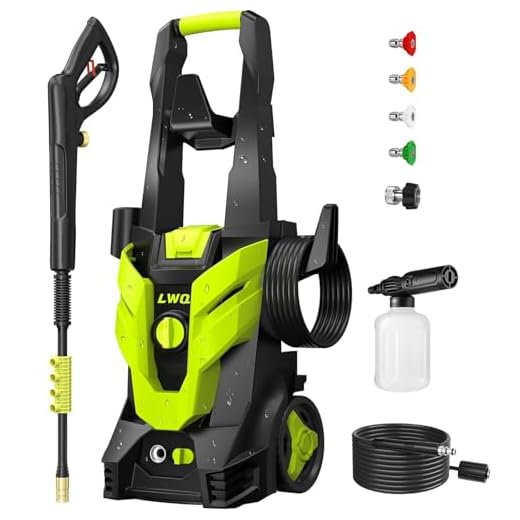
You should typically expect to find the following components:
- Pressure washer body
- High-pressure hose
- Spray gun
- Wand
- Nozzle tips (vary in size and spray pattern)
- Detergent tank (if applicable)
- Wheels
- Assembly tools (if included)
- Instruction manual
Ensure that each component matches its description in the inventory list. If any part is missing or damaged, contact the manufacturer or retailer for assistance in obtaining a replacement.
This inventory check is an important step as it will help you avoid frustration and save time during the assembly process. Once you have confirmed that all the components are present and in good condition, you can proceed to the next step of the assembly process.
Question-answer
What tools do I need to assemble a Kawasaki pressure washer?
You will need a socket wrench, screwdriver, pliers, and an adjustable wrench to assemble a Kawasaki pressure washer.
Is assembly required for a Kawasaki pressure washer?
Yes, assembly is required for a Kawasaki pressure washer. The unit will come partially assembled, and you will need to attach the handle and other components before it is ready to use.
Are there any specific instructions for assembling the handle of a Kawasaki pressure washer?
Yes, there are specific instructions for assembling the handle of a Kawasaki pressure washer. First, position the handle behind the pressure washer engine and align the holes in the handle with the mounting studs on the engine. Then, insert the bolts through the holes and tighten them securely with a wrench.
What should I do if I encounter any difficulties during the assembly process?
If you encounter any difficulties during the assembly process of a Kawasaki pressure washer, refer to the instruction manual that comes with the unit. The manual provides step-by-step instructions and troubleshooting tips to help you resolve any issues.
How long does it take to assemble a Kawasaki pressure washer?
The time it takes to assemble a Kawasaki pressure washer will depend on your experience and familiarity with the assembly process. On average, it may take around 30 minutes to an hour to complete the assembly.
Recent Posts
-

How To Connect Soap To Honda Pressure Washer
June 28, 2024 -

A To Z Pressure Washing Scam
June 27, 2024 -

How To Pressure Wash Your Home With A Garden Hose
June 27, 2024 -

Where Can I Buy Honda Pressure Washer Parts
June 25, 2024 -
