
Blog
How To Adjust The Valves On A Honda Pressure Washer
Proper valve adjustment is essential for maintaining the performance and longevity of your Honda pressure washer. Over time, the valves can become out of sync, leading to decreased power and efficiency. Fortunately, adjusting the valves on a Honda pressure washer is a relatively simple process that can be done at home.
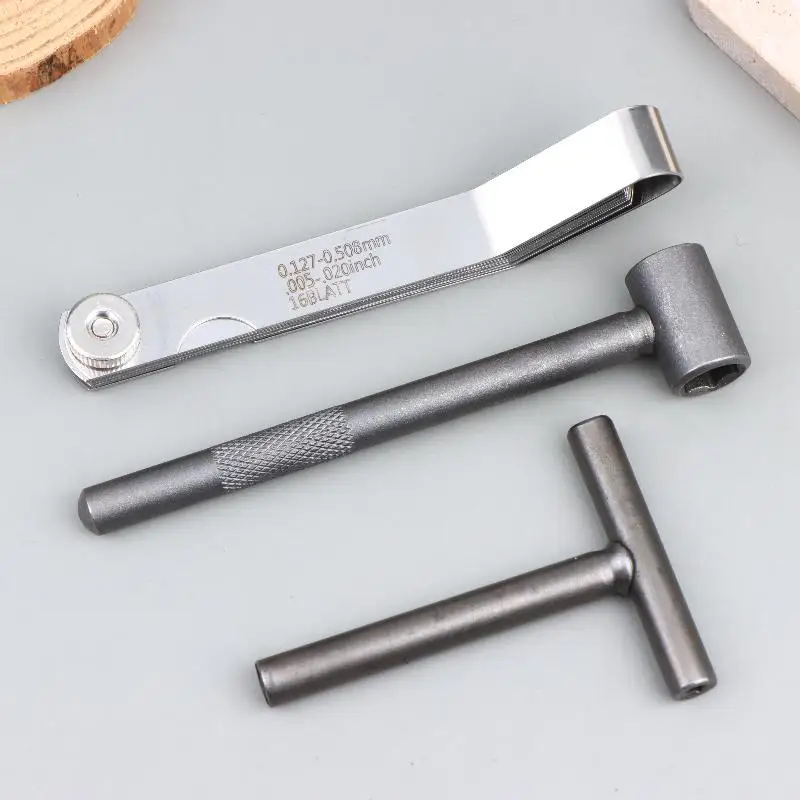
Step 1: Gather the necessary tools and materials. Before you begin, make sure you have the right tools on hand. You will need a wrench, a feeler gauge, and your Honda pressure washer’s owner’s manual. It’s also a good idea to have a clean cloth or rag nearby to wipe away any dirt or debris.


Step 2: Locate the valve cover. The valve cover is usually located on the top of the engine and is held in place by a series of bolts or screws. Use your wrench to carefully remove these bolts or screws and lift off the valve cover.
Note: Be sure to consult your owner’s manual for specific instructions on how to remove the valve cover for your specific Honda pressure washer model.
Step 3: Inspect the valves. With the valve cover removed, you will have a clear view of the valves. Take a moment to inspect them and make sure they are clean and free of any obstructions. If necessary, use your cloth or rag to remove any dirt or debris.
Step 4: Adjust the valves. Now it’s time to adjust the valves. Refer to your owner’s manual for the recommended valve clearance specifications for your Honda pressure washer model. Using the feeler gauge, carefully measure the clearance between the valve stem and the camshaft. If the clearance is too small or too large, use your wrench to adjust the nut on the valve stem until the correct clearance is achieved.
Tip: Take your time and make small adjustments. It’s better to go slowly and get it right than to rush and risk damaging the valves.
Step 5: Reassemble and test. Once you are satisfied with the valve adjustments, carefully reattach the valve cover and secure it with the bolts or screws. Double-check that everything is in place and tight. Start up your Honda pressure washer and test it to ensure that the valve adjustments have improved its performance and efficiency.
Remember, regular valve adjustments are an important part of maintaining your Honda pressure washer. By following these steps and staying on top of your maintenance routine, you can keep your pressure washer running smoothly for years to come.
What Are Valves On A Honda Pressure Washer?
Valves are essential components in a Honda pressure washer that help regulate the flow of water and air within the machine. They play a crucial role in maintaining the proper functioning of the pressure washer and ensuring its overall efficiency.
There are two primary types of valves found in a pressure washer: intake valves and discharge valves. The intake valve is responsible for allowing the entry of water into the pump, while the discharge valve manages the release of pressurized water from the pump. These valves are critical for creating and maintaining the necessary pressure required for cleaning tasks.
In a Honda pressure washer, the valves are typically made of durable materials such as stainless steel or brass. This ensures their longevity and ability to withstand the high-pressure water flow. The valves are also designed to open and close at specific times during the operation of the pressure washer, allowing for the appropriate flow of water and air.
Proper valve adjustment is crucial for maintaining the optimal performance of a Honda pressure washer. If the valves are not adjusted correctly, it can lead to reduced pressure output, water leaks, or even damage to the pump. Regular inspection and adjustment of the valves are recommended as part of routine maintenance to ensure efficient operation and prolong the lifespan of the pressure washer.
When adjusting the valves on a Honda pressure washer, it is important to refer to the manufacturer’s instructions and follow the recommended procedures. This will help ensure accurate adjustment and prevent any potential damage to the valves or other components of the pressure washer. If you are unsure or inexperienced with valve adjustment, it is recommended to seek professional assistance or consult the Honda pressure washer’s manual for guidance.
In conclusion, valves are essential components of a Honda pressure washer that help regulate the flow of water and air, ensuring efficient cleaning performance. Proper valve adjustment and regular maintenance are crucial for optimal functioning and longevity of the pressure washer.
Understanding The Function Of Valves
Valves are an essential component in a Honda pressure washer that helps regulate the flow of water and fuel throughout the machine. They play a crucial role in maintaining proper pressure, preventing backflow, and ensuring the optimal performance of the pressure washer.
Types of Valves
There are two main types of valves found in a Honda pressure washer:
| Valve Type | Function |
|---|---|
| Intake Valve | The intake valve opens to allow a fuel-air mixture to enter the combustion chamber, facilitating the ignition process and producing power. |
| Exhaust Valve | The exhaust valve opens to release the combustion byproducts, such as exhaust gases, from the combustion chamber. |
Both intake and exhaust valves must open and close at the proper timing to ensure efficient operation of the Honda pressure washer.
Valve Adjustment
Over time, valves can become misaligned or worn, leading to decreased performance, loss of power, or even engine damage. It is crucial to regularly check and adjust the valves to maintain optimal performance.
The valve adjustment process involves:
- Checking the valve clearance using a feeler gauge
- Loosening the lock nut on the valve adjustment screw
- Turning the adjustment screw to achieve the specified clearance
- Tightening the lock nut
It’s essential to follow the manufacturer’s guidelines and specifications when adjusting the valves to ensure proper operation and prevent any damage to the engine.
Regular valve maintenance and adjustment will help extend the lifespan of your Honda pressure washer and ensure optimum performance during every use.
Why Do Valves On A Honda Pressure Washer Need Adjustment?
The valves on a Honda pressure washer may need adjustment for various reasons. Over time, the valves can become worn or dirty, affecting their performance and causing issues with the operation of the pressure washer. Adjusting the valves is a necessary task to ensure the optimal functioning of the machine.
One of the main reasons why valves on a Honda pressure washer need adjustment is due to wear and tear. As the pressure washer is used, the valves open and close countless times, which can cause them to wear down and not seal properly. This can result in loss of pressure and decreased performance.
Another reason why valve adjustment is important is due to the buildup of dirt and debris. Over time, the valves can become clogged with dirt, preventing them from opening and closing smoothly. This can lead to improper sealing and a decrease in pressure. Adjusting the valves allows for cleaning and removal of any debris, ensuring smooth operation.
Improper valve adjustment can also result in the pressure washer running either too lean or too rich. If the valves are not adjusted correctly, the air to fuel mixture may become imbalanced, affecting the engine’s performance. Adjusting the valves to the manufacturer’s specifications helps maintain the proper air to fuel ratio, ensuring optimal performance and fuel efficiency.
Regular valve adjustment is a crucial part of the maintenance routine for Honda pressure washers. It helps maintain the performance and efficiency of the machine, ensuring that it operates at its best. By regularly adjusting the valves, you can prolong the lifespan of your Honda pressure washer and keep it running smoothly for years to come.
| Reasons why valves need adjustment: |
|---|
| Wear and tear |
| Buildup of dirt and debris |
| Improper air to fuel mixture |
Step-by-Step Guide To Adjusting The Valves
Adjusting the valves on your Honda pressure washer is an important maintenance task that helps ensure maximum performance and longevity of your machine. Follow these step-by-step instructions to properly adjust the valves:
Step 1: Prepare the Pressure Washer
Before starting the valve adjustment, make sure the pressure washer is turned off and completely cool. Also, disconnect the spark plug wire to prevent accidental starting.
Step 2: Access the Valves
Remove the casing or cover that gives you access to the valves. This may involve unscrewing screws or using a wrench to unfasten bolts. Take your time to avoid damaging any components.
Step 3: Determine Valve Clearance
Using a feeler gauge, measure the clearance between the valve stem and the rocker arm. Refer to your pressure washer’s manual to determine the specific clearance measurements for intake and exhaust valves.
Step 4: Adjust the Valves
Loosen the lock nut using a wrench, and then use a screwdriver to turn the adjuster screw until you achieve the proper valve clearance. Use the feeler gauge to double-check the clearance as you make adjustments. Once properly adjusted, tighten the lock nut to secure the setting.
Step 5: Reassemble and Test
Reinstall the casing or cover, ensuring all screws or bolts are tightened securely. Reconnect the spark plug wire and start the pressure washer. Listen for any abnormal sounds or vibrations that may indicate further adjustments are necessary.
By regularly adjusting the valves on your Honda pressure washer, you can maintain optimal performance and prolong its lifespan. Following this step-by-step guide ensures that you are performing the valve adjustment correctly and safely.
Gathering The Necessary Tools
Before adjusting the valves on your Honda pressure washer, it is important to gather all the necessary tools to ensure a smooth and successful process. The following tools are required for this task:
- Socket wrench set
- Feeler gauge set
- Torque wrench
- Screwdriver
- Shop rag or towel
Make sure that you have these tools readily available before starting the valve adjustment process. This will help save time and prevent any unnecessary interruptions during the task.
Cleaning The Valves Before Adjustment
Before adjusting the valves on your Honda pressure washer, it is essential to clean them thoroughly to ensure proper functioning. Over time, dirt, debris, and residue can accumulate on the valves, causing them to stick or not close properly.
To clean the valves, follow these steps:
- Start by disconnecting the spark plug wire to prevent accidental starting.
- Remove the valve cover to expose the valves. This can usually be done by unscrewing a few bolts or screws.
- Inspect the valves for any visible dirt or debris. If there is any, use a brush or compressed air to gently remove it.
- If the valves appear to be sticking, use a solvent or specific valve cleaner to dissolve any residue. Apply the cleaner and let it sit for a few minutes before wiping it off with a clean cloth or paper towel.
- Check the valve seats for any signs of damage or wear. If necessary, use a valve seat cutter or replace the valve seats to ensure a proper seal.
- Once the valves and seats are clean and free from debris, reassemble the valve cover and tighten the bolts or screws securely.
By cleaning the valves before adjustment, you can ensure that they are in optimal condition, allowing for precise adjustment and better overall performance of your Honda pressure washer.
Adjusting The Valves On A Honda Pressure Washer
As with any piece of machinery, regular maintenance is necessary to ensure that your Honda pressure washer operates at its best. One important aspect of maintenance is adjusting the valves. The valves control the flow of water and fuel into the engine, and if they are not properly adjusted, the pressure washer may not perform efficiently or may not start at all.
Why Adjust The Valves?
Over time, the valves on your Honda pressure washer can become misaligned or worn out. This can result in decreased performance and efficiency. Adjusting the valves will help to ensure that they are working correctly and allow your pressure washer to operate at its full potential.
Tools You Will Need
Before you begin adjusting the valves on your Honda pressure washer, you will need to gather a few tools:
- Socket wrench set
- Feeler gauge
- Flathead screwdriver
Steps To Adjust The Valves
1. Start by disconnecting the spark plug wire to prevent the pressure washer from accidentally starting.
2. Remove the valve cover by using a socket wrench to unscrew the bolts holding it in place. Set the valve cover aside.
3. Locate the intake valve and the exhaust valve. These are typically marked with “IN” and “EX” respectively.
4. Using a feeler gauge, check the gap between the valve and the valve seat for both the intake and exhaust valves. The correct gap specification can be found in your pressure washer’s manual.
5. If the gap is too small, you will need to loosen the lock nut on top of the valve stem and use a flathead screwdriver to adjust the valve clearance. If the gap is too large, you will need to tighten the lock nut and adjust the clearance accordingly.
6. Once you have made the necessary adjustments, recheck the gap with the feeler gauge to ensure it is within the specified range.
7. Once the valves are properly adjusted, reattach the valve cover and tighten the bolts snugly with the socket wrench.
8. Reconnect the spark plug wire and start the pressure washer to test its performance. If the engine runs smoothly and the pressure washer operates as expected, you have successfully adjusted the valves.
By following these steps and performing regular valve adjustments, you can keep your Honda pressure washer running smoothly and efficiently for years to come.
Questions and answers,
Why do I need to adjust the valves on my Honda pressure washer?
Adjusting the valves on your Honda pressure washer is important because over time, the valves can become worn or misaligned, which can result in poor performance and loss of pressure. By adjusting the valves, you can ensure that the engine is running smoothly and efficiently.
How often should I adjust the valves on my Honda pressure washer?
The frequency of valve adjustments can vary depending on usage and maintenance. As a general guideline, it is recommended to check and adjust the valves on your Honda pressure washer at least once a year. However, if you notice any decrease in performance or unusual noises coming from the engine, it is a good idea to check the valves sooner.
What tools do I need to adjust the valves on my Honda pressure washer?
To adjust the valves on your Honda pressure washer, you will need a few basic tools, including a socket set, feeler gauges, and a torque wrench. Additionally, it is recommended to have the owner’s manual for your specific model of pressure washer, as it will provide detailed instructions and specifications for the valve adjustment process.
Can I adjust the valves on my Honda pressure washer myself, or do I need to take it to a professional?
While adjusting the valves on a Honda pressure washer may seem daunting, it is possible to do it yourself if you have some basic mechanical knowledge and the right tools. The owner’s manual for your pressure washer will provide step-by-step instructions on how to adjust the valves properly. However, if you’re unsure or uncomfortable about doing it yourself, it is always a good idea to take your pressure washer to a professional for servicing.
What are the signs that indicate the valves on my Honda pressure washer need adjustment?
There are a few signs that may indicate that the valves on your Honda pressure washer need adjustment. These include a decrease in performance or power, difficulty starting the engine, excessive vibration or noise from the engine, or irregular engine idle. If you notice any of these signs, it is a good idea to check and adjust the valves on your pressure washer.
Why is it necessary to adjust the valves on a Honda pressure washer?
It is necessary to adjust the valves on a Honda pressure washer to ensure proper engine performance and prevent any issues that may arise due to valve clearance problems. By adjusting the valves, you can maintain optimal power output, fuel efficiency, and overall engine reliability.
What are the signs that indicate the need for valve adjustment on a Honda pressure washer?
There are a few signs that may indicate the need for valve adjustment on a Honda pressure washer. These signs include loss of power, hard starting, engine misfire, excessive noise, and poor fuel efficiency. If you notice any of these issues, it is recommended to check and adjust the valves as necessary.